We are aware that staring at the white screen for too long isn’t a good thing. We can’t prevent having sore eyes as we are stuck with smart devices almost every day. But then comes our savior, the Dark Mode on your WordPress website.
The Dark mode or night mode is a very popular trend right now. The sheer reason behind its soaring popularity lies within its capabilities to remove stress from our eyes and relieving our nerves. It’s the perfect healer to ease your cherished visitors on your website by providing them a calming interface.
Surprisingly, it’s very easy to integrate the dark mode into your WordPress website. The fun fact is, you can give your visitors the joy of having a dark mode interface on the front end as well as enjoy it yourself on the backend. Both are possible.
In this article, we will talk about what the dark mode is and how much of a benefit it brings to you. And lastly, we will show you the easiest way of adding the dark mode to your WordPress website, both the frontend and the backend. So, let’s proceed!
How To Turn On Dark Mode On Your WordPress Website
Table of Content:
- What Is The Dark Mode?
- Benefits of using the Dark Mode
- How To Turn On the Dark Mode Inside WordPress Website
- Install Darklup Dark Mode Plugin for WordPress
- Activate the Dark Mode
- Turn On Frontend Floating Switch
- Customize Button
- Customize Frontend Dark Mode Color
- How To Turn On the Dark Mode Inside WordPress Backend
- Install Darklup Dark Mode Plugin
- Turn On the Backend Dark Mode Feature
- Switch The Backend Dark Mode
- Change Backend Color Scheme
- Dye Your Website With Exquisite Dark Mode Colors With Darklup
What Is The Dark Mode?
The Dark Mode is an interface with black color as the background with white content. This is a display setting that forcefully removes the whites from the screen and replaces them with a dark color. Dark mode can suppress the bright lights emitted from the display, making it easier on the eyes and reduces the possibility of having sore eyes.
The best way to describe the dark mode is, think of black paper with white ink instead of white paper with black ink. People can feel at ease by looking at the dark mode as there are fewer lights in the surroundings during the night. With some special software or button, people can easily turn on this feature inside their devices.
Benefits of using the Dark Mode
There are a good amount of benefits of using a dark mode on your website. For example, Dark mode can-
- Reduce the total light emission from the device
- Reduce eye strain and prevents sore eyes
- Lower the battery consumption of the device and saves extra energy
- Increase the time spent on websites resulting increase in Conversion rate
Seeing the benefits, the Dark Mode can really be a turning point for your website to gain new heights and have a lot more visitors. As a site owner, you probably won’t miss this chance to get this feature on your site successfully.
Even more, the Darklup dark mode plugin empowers you to customize the dark mode appearance of your website, as much as you like. This means you can switch between color modes for the dark theme with just a simple click. It requires even less effort to bring a new taste to your sites’ appearance with Darklup.
Just a reminder, Dark Mode and Night Mode may sound the same but they are not. While the Dark mode involves changing the whole user interface from light to dark theme, the Night mode filters out blue lights and changes the emitted display color to something mild.
In reality, both of these modes have plenty of exploits to relieve your sore eyes. Enough of the theories, let me show you how to enable the Dark Mode on the WordPress website.
How To Turn On
As you already know all about the Dark Mode feature, it’s time to onboard it to your WordPress website. Although you can turn on dark mode via web browsers like Chrome, it doesn’t offer quality interfaces. With a dedicated Dark Mode plugin, you can have much more than the cut-rates.
Step 1: Install Darklup Dark Mode Plugin for WordPress
Among the many Dark Mode plugins available on the market, we only pick the best for our visitors. So, we are going with the Darklup dark mode plugin.

Darklup is a freemium plugin for WordPress which is jam-packed with tonnes of features. While it’s very simple and easy to use, you get to save the extra energy by not coding at all.
Just go to the Plugins tab in your WordPress Dashboard and click on the Add New button. Simply, go to Dashboard> Plugins> Add New and type Darklup in the search field.
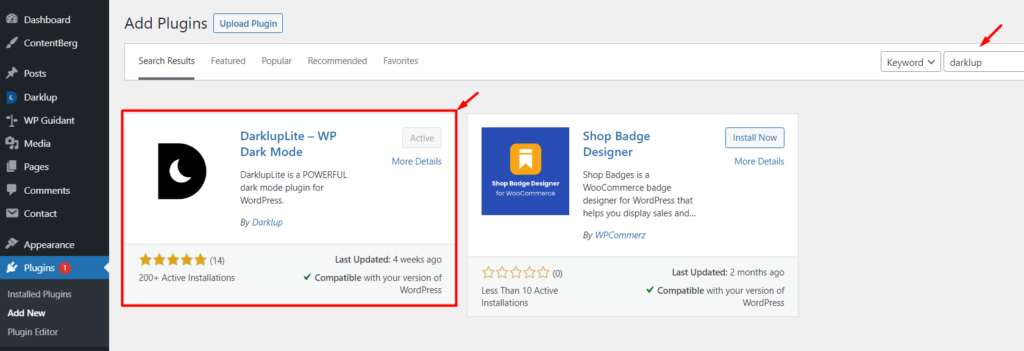
Then when you see the plugin on the display, click on the Install button followed by Activate and you will see the plugin menu on the Dashboard. We already have it on our site. That’s why the Activate button is gray in the picture about the dark mode on your WordPress website.
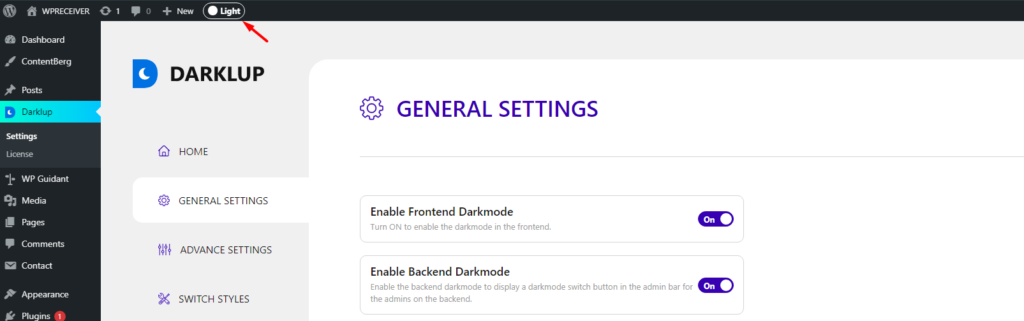
Step 2: Activate the Dark Mode
For Darklup, the General Settings section holds the keys to turn on the dark mode feature on your website. Once you install the plugin, you will see the “Enable Frontend Darkmode” button and the “Enable OS Aware Dark Mode” button turned on. This is a default setup from the plugin directory.

The “Enable Frontend Darkmode” switch lets you activate the dark mode feature for the site’s frontend. Once initiated, any user can see the dark theme upon visiting the website. Although it doesn’t let the users access the dark mode switch, you can turn it on/off as an admin.
Apart from that, the “Enable OS Aware Mode” refers to the automatic dark mode feature based on OS color preference. If your visitor has dark mode enabled on their system OS, the website will automatically turn dark when they visit.
Again, you can make the dark mode the default appearance of your website. That will keep the dark theme turned on regardless of any trigger from the OS or admin. You will find the option in the Advanced Settings section below.

Once you click on the Save Settings button, all the changes will take effect immediately.
Step 3: Turn On Frontend Floating Switch
The floating switch for dark mode lets users toggle the dark theme on and off as they wish. You will find the option “Show Floating Switch” at the bottom of the General Settings section. Switching it on will place a dark mode switch in the sites’ frontend to let users play with it.
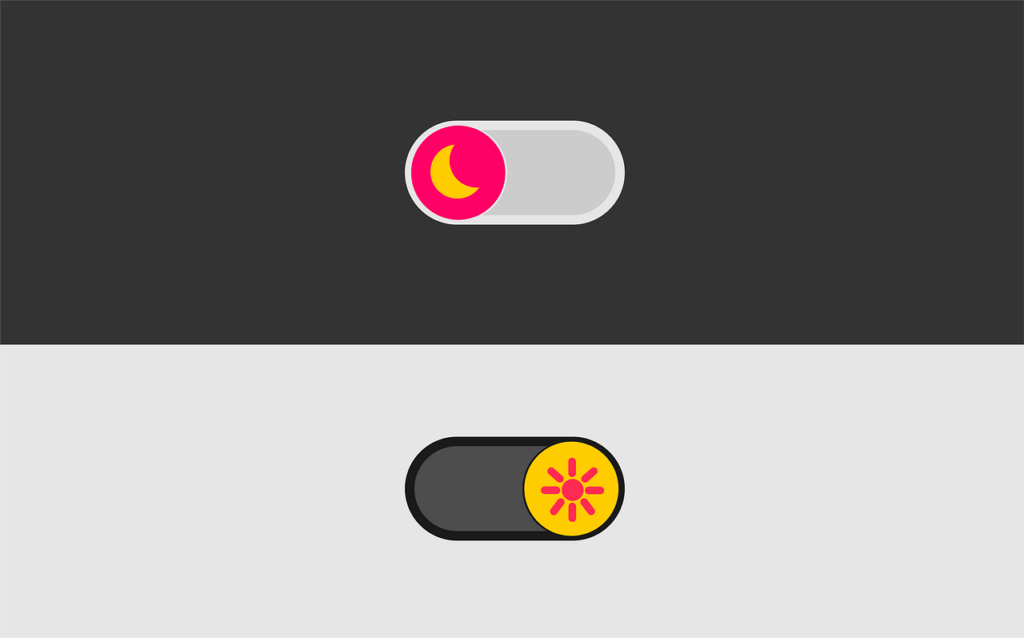
Here’s how the button looks like to the viewers in dark mode on your WordPress website. The button is positioned on the bottom-right-hand side.

There is a separate tab named Switch Styles for customizing the dark mode floating switch on the frontend. You will find more switch styles, size, margin, and placement options here. For the free version, the options are limited to 3 buttons while the Darklup premium gets you 15 unique switch styles.
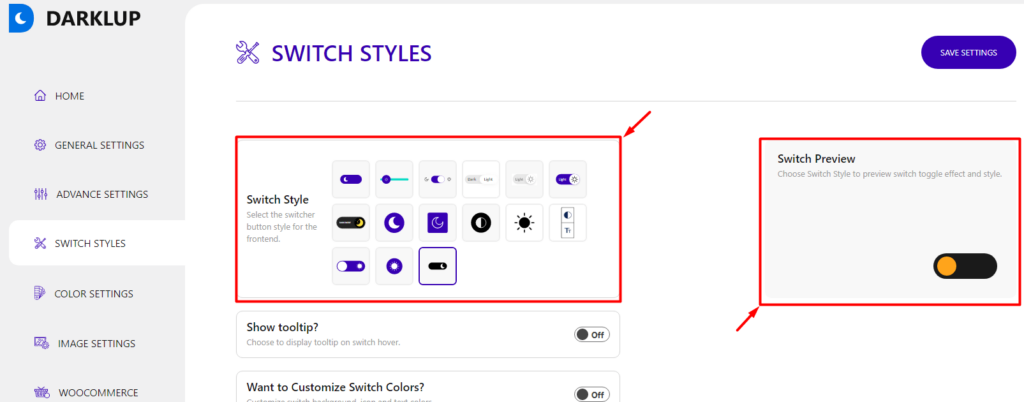
You can choose any button from the plugin settings. There is a live preview window inserted in the Switch Styles section where you can see how the button will look in action.
Step 4: Customize Button
By scrolling further down in the Switch Style section, you will see more options to customize the floating switch colors and sizes.

Turning on the “Want To Customize Switch Colors?” option will unfold several color settings below. You can fully change the button background, icon, and text colors for both the light mode and dark mode.
Step 5: Customize Frontend Mode Color
Lastly, you can change the whole frontend color scheme for the dark mode using Darklup. They are the ready-to-deploy color presets designed by experts. You will find them inside the Color Settings section.

Currently, you can choose from the 12 preloaded color schemes from here. They will appear on the display once you turn on the “Frontend Dark mode Color Preset Enabled” option. You are advised to choose the right color scheme that blends well with your theme.
Once again, you can pick your own color by turning on the “Want to Frontend customize color?” button. This option enables you to create unlimited color variations to the frontend display.
How To Turn On the Mode Inside WordPress Backend
Darklup is not limited to the user frontend but it also expands to the admin backend too. By default, the WordPress admin is less aggressive to the eyes than the frontend. Still, it can’t compare to the ultimate peaceful backend interface initiated by Darklup. While your visitors are enjoying the dark mode, why not you too?
Step 1: Install Darklup Dark Mode Plugin
Darklup has a dedicated backend function to make the dashboard look better and easier to focus in the dark mode. If you already have Darklup installed on your site, just head for the next step. If not, grab the plugin quickly!
Step 2: Turn On the Backend Dark Mode Feature
Once installed, you will be taken to the General Settings section of the plugin. There, you have to turn on the “Enable Backend Dark mode” switch to initiate the feature for the WordPress backend.
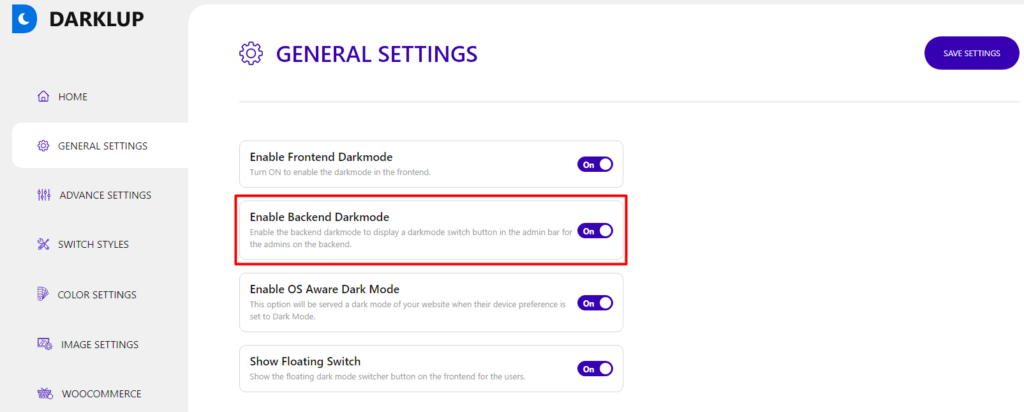
Remember to hit the “Save Settings” button located at the top-right corner to let the changes take effect. Unless you do that, the plugin won’t load the new settings.
Step 3: Switch The Backend
On the reloaded window, you will see a new dark mode switch on the admin panel. It’s located at a convenient place where you can easily turn it on.
By default, the dark mode switch is turned off or showing that the light mode is currently active. To change it, simply click on the button and the backend will instantly turn to the dark theme.

Now it’s much easier for you to look into your WordPress dashboard while avoiding sore eyes completely. The backend dark mode switch varies for every user/admin. Meaning, each person has full control over their individual site backend.
Step 4: Change Backend Color Scheme
Once you have the backend dark mode activated, let’s try changing the interface color using color presets provided by Darklup. The options are located in the Color Settings section, below the frontend color customization options.

You can see the option named “Admin Dark mode Color Preset Enabled”. Turning it on will reveal the color presets arranged neatly below it. Once you picked a suitable color, hit the Save Changes button to initiate the new color preset.
Also, you will find custom backend color options right below. In case you want more than the presets, you can create unlimited color schemes using the custom color options.
Dye Your Website With Exquisite Dark Mode Colors With Darklup
Having a dark mode on your website benefits a lot, both you and your users. Whether it is to reduce the pressure from your eye, relieving from sore eyes, or making the site look elegant with the dark theme, the dark mode is clearly the best way of doing it.
Here, we learned what the dark mode is and how it benefits. In the end, we went on the usage of the Darklup dark mode plugin to magnify the beauty of your site ten folds. Now you know the proper way to add dark mode to your WordPress sites’ frontend and backend.
The post No More Sore Eyes Get The Dark Mode On WordPress Website appeared first on Visualmodo.


0 Commentaires