Google Analytics 4 migration guide and reasons to do it, Google Analytics is now available at some point. Google Analytics 4 is available in “beta” tests, open to all users in tempo4 as the main option20. From Google to configured when you launch a new website and need web analytics.
Google Analytics 4 Migration Guide & Reasons To Do It

In this article, we’ll talk about Google Analytics 4 migration guide and reasons to do it; we want to give you an overview of the new features in Google Analytics 4. Whether you should set up Google Analytics 4 migration near Universal Analytics; or even fully migrate to GA 4, and also what to consider when getting started with Google Properties Analysis 4.
What’s New in Google Analytics 4?
In one of our previous blog installations, we took a closer look at how changes between Universal Analytics and Google Analytics 4 have changed. To summarize a few points, Google Analytics 4 focuses more on users than on individual sessions like Universal Analytics.
So, it has a concept of data streams, which means your website and the app can be integrated into a single property and provide data from individual users across multiple platforms, as examples were defined as Google Analytics examples, as some relatively well-known measurements (by decision determination). If you want to understand the differences, Google offers an article.
Should I start with Google Analytics 4?
Although Google has announced that Google Analytics 4 will go into production, it is still far from ready. There are still bugs that occur frequently. At the end of January, for example, all sessions were attributed to direct traffic for a few days on various properties of Google Analytics 4.
Whether you should configure Google Analytics 4 for your website or even consider it as an option arises. Unique web analytics. While much of the value in existing Universal Analytics settings has been optimized throughout individual tracking, starting your Google Analytics 4 property will allow you to start believing in data.
When migrating to Google Analytics 4, you sync data not from your existing instance of Universal Analytics, so any day you don’t own Google Analytics 4 will be a “data loss” day.
When migrating to Google Analytics 4, you don’t sync data from your existing Universal Analytics instance, so any day you don’t own Google Analytics 4 will be a “data loss” day. However, Google Analytics has some exciting additions, such as B. Option to send data directly from Google4 to Google BigQuery, visualizations, tracking events selected for shipping, and dashboards for user-selected functions for data transfer.
Also, it doesn’t hurt to be familiar with Google’s next-generation web analytics tools. But, on the other hand, don’t panic; Universal Analytics is not going away for some time. As mentioned above, some features of Google Analytics 4 are still in development, and some key elements are currently missing, such as B.
Direct connection to Google Search Console
So, Universal Analytics is currently the most popular analytics platform in the world. For example, and will use Google Analytics 2 on some websites in the coming years. However, at some point, we expect the development to stop focusing on new universal analytics features and support; or even disappear from Google. And also, on the other hand, it is possible to create new universal analytics properties. This means it will work for a while.
Our Suggestion – Run Universal and Google Analytics 4 Simultaneously
How to migrate to Google Analytics 4
And whether you create a property from scratch or upgrade an existing Universal Analytics property, the process is very similar. So, in the following steps, we walk you through the upgrade process as the existing Universal Analytics property provides a Google Analytics UI. This also implies that you implement Google Tag Manager as we implement changes to Google Analytics via Tag Manager 4.
If you have modified your Google Analytics tracking code on your website, now might be a good time to evaluate the Google tags for the manager.
Contact us now for a free initial consultation!
Discover what you need for web optimization and data tracking today
Step 1: Configure a Google Analytics Property 4
When opening your current Universal Analytics property, you probably didn’t; or a new option appeared in the “GA4 Setup Wizard” properties section.
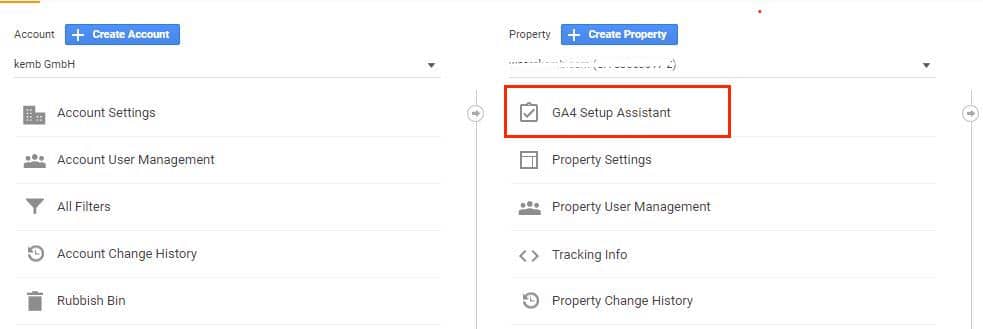
House is your gateway to your Google Analytics 4 migration property.
When you click on start the wizard, a new window will open asking if you want to proceed and create a new GA 4 property. You can start it directly by clicking on “Start.” As mentioned in the UI, this will not affect your existing Universal Analytics property and settings.
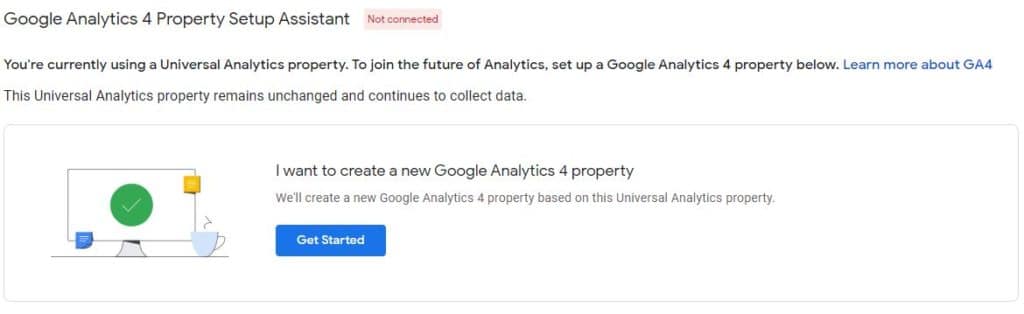
Step 2: Setting the property
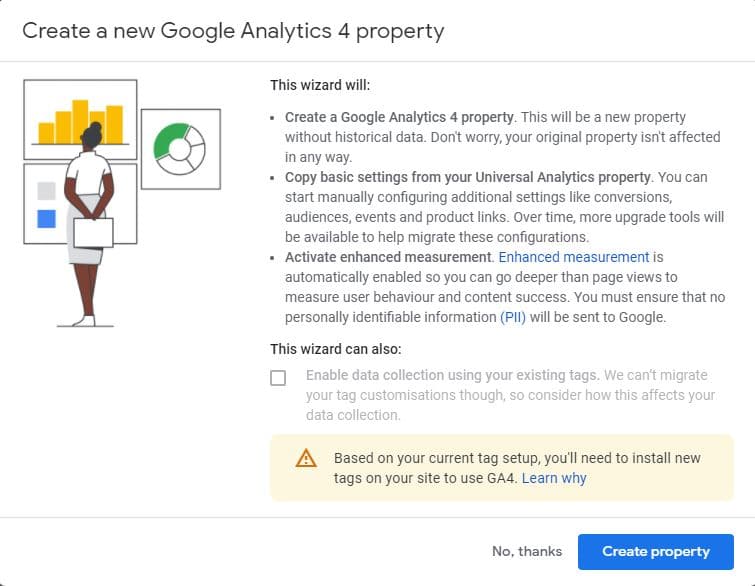
You’ll get a quick overview of what will happen when you create your property. In short, and will configure the new property like this:
- no historical data (this is why you should start your property right after you finish reading)
- and will copy some basic settings from your Universal Analytics property, such as the property name
- and “and will enable enhanced Measurement” to track more than just page views.
You must verify that this setting will automatically send no personally identifiable information (PII) to Google. We’ll see this quickly in a later step.
For now, we click on “Create property.” If you implemented Universal Analytics via gtag.js, you could launch your property directly by checking the gray box below. However, as we will be going the Google Tag Manager route, this is not currently available.
On the Google Analytics site, you are done with a basic setup. You should see that the setup wizard has changed from a red sign to a green one in the top panel and states, “Connected to [insert your property name here].”
There are other possibilities for configuring your property. Still, for now, we want to ensure your installation also sees traffic and go ahead to install the Google Analytics 4 tag via Google Tag Manager. To do this, click on “Tag Installation.”
Step 3: Setting Up Your Data Collection

It will open an overview of the attached flows and a new concept. And describe how the data is sent to the property. If you’ve just started our process, there should only be one web property. Select an overlay like the one below to open the overlay, and display the measurement ID in the upper right corner. Then click the Copy button or highlight the ID and copy it manually.
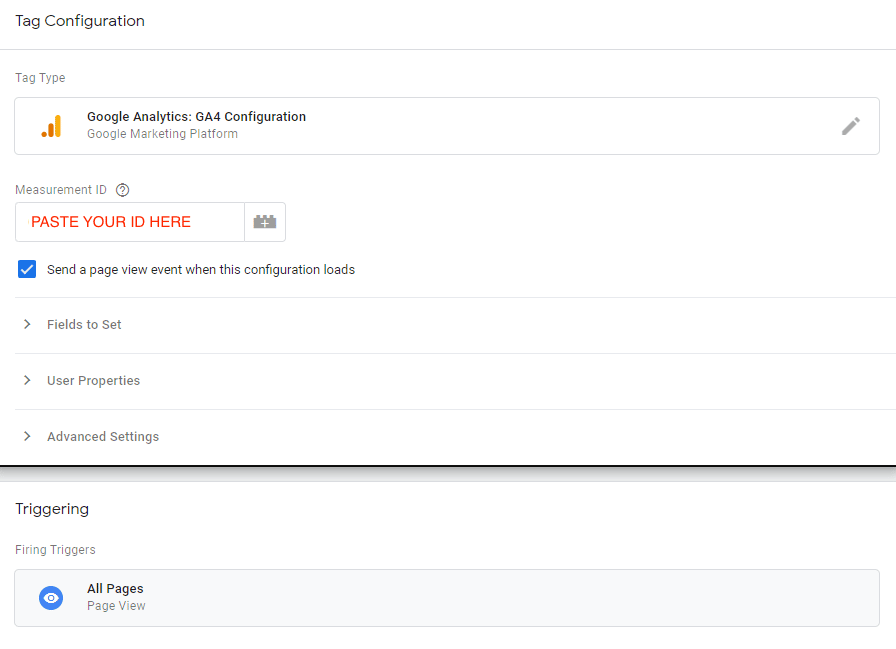
Step 4: Activate Google Analytics 4 using Google Tag Manager
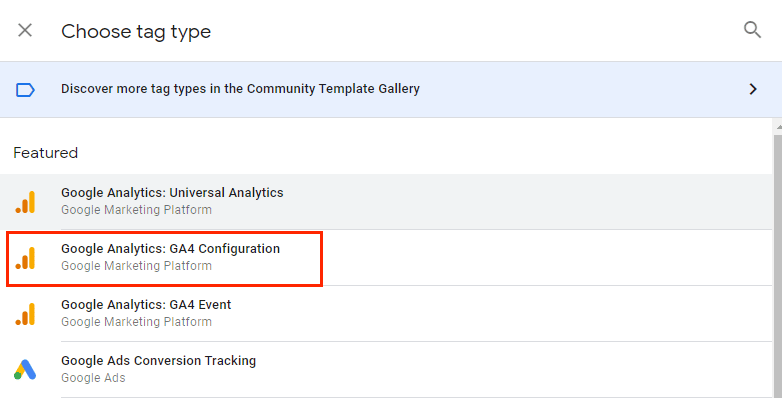
Now when you switch to Google Tag Manager (assuming it’s installed), you’ll need to set a new tag. Google already provides two GA 4 specific tags:
- The GA4 configuration tag launches Google Analytics for your Google Analytics 4 property on a specific page. It handles behaviors like setting up Google Analytics cookies and sending standard and enhanced events.
- GA4 event tag allows you to send custom events to Analytics in addition to events sent automatically or through enhanced measurement.
We’ll use the Configuration Tag for now. However, the GA4 event tag is essential for bringing custom events. We’ll delve into that in an upcoming blog post.
You need to add the GA 4 assessment ID in the field provided inside the tag. And add an appropriate trigger, “All pages,” or a trigger configured to run correctly with your consent management platform.
However, you can configure all other settings to provide more information or better tracking capabilities for Google Analytics 4. Still, as this can be relatively specific to individual sites, we’ll skip this part for now.
Step 5: Preview and test your configuration
Be sure to preview the installation after configuring the tag and trigger. And verify that the GA 4 essential configuration tag fires on every page as long as the user has given their consent. Then, if everything is working correctly, you can publish your changes.
Congratulations, you have done everything necessary for a basic configuration.
You should see the data in the real-time view of your property now!

For now, this is a basic installation. Next, you can configure property details such as the data retention period (default here is 2 months, if possible, in your current legislation, set it to 14 months). And think about what events you want to track on Google Analytics 4 and prepare them in Google Tag Manager. Good analysis!
How are you? – Some important things
As mentioned above, some aspects still need to be mentioned. In addition, and it is still in development, some features you would expect from Universal Analytics are not currently available (yet).
One of these features is that the default ais grouping cannot modify or customize further. Google defines how they assign traffic, but if you get used to their internal definitions, this will be a change for now.
And where can I set the “anonymizeIP” value to true in Google Analytics 4?
If you are using Universal Analytics, you know that, at least in the EU, you need to set the “anonymize IP” setting to “true” to prevent sending unique IP data to Google servers in the United States prize. For Google Analytics 4, this is done automatically for you. Quoting from Google’s support page, “For Google Analytics 4 properties, IP anonymization enabled by default”.
Can I use Advanced Ecommerce out of the box?
Unfortunately, this is impossible, but you can adjust your Tag Manager implementation to use it as long as you send the information to a data layer that the new event tags can read. We’ve prepared a detailed guide for setting up e-commerce tracking with Google Analytics 4.
How about starting a new site? Should I start with GA 4?
We believe and can glean more information from Universal Analytics and still create new assets for UA. So, suppose you have just launched a website and use Google Analytics to analyze web tracking.
And in this case, we recommend that you configure the Universal Analytics property and the Google Analytics 4 property. And make sure to configure both after-event mappings on your website to reflect your current business model, and to get the most out of your data, configure the advanced configuration of ExtractWeb Analytics.
From now on, you can’t change or customize the Ais pattern. This is because Google defines how they distribute traffic, but this is a change if you use their internal definition.
Where can I set the value “anonymizeIP” to “true” in Google Analytics 4?
From Universal Analytics, you probably know that, at least in the EU, you need to set the “anonymizeIP” setting to “true” to avoid sending accurate data about IP to Google’s servers in the US. For Google Analytics 4; this is done automatically for you. Quoting from Google’s support page, “For Google Analytics 4 properties, IP anonymization enabled by default”.
Can I use Advanced Ecommerce out of the box?
Unfortunately, this is not possible, but you can adjust your Tag Manager implementation to use Google Analytics 4 as long as you send the information to a data layer that the new event tags can read. We’ve prepared a detailed guide for e-commerce tracking with Google Analytics 4.
How about starting a new site? Should I start with GA 4?
We believe there is still much more information to gain from Universal Analytics, and it is still possible to create a new property for UA. For example, suppose you have just launched a website and are analyzing web tracking with Google Analytics. In that case, we recommend you configure a Universal Analytics property and a property and ensure you configure both to reflect your current business model following an event mapping on your website and detailed configuration to get the most out of your web analytics.
The post Google Analytics 4 Migration Guide & Reasons To Do It appeared first on Visualmodo.


0 Commentaires