In a world where self-care and beauty take center stage, finding the perfect beauty salon or spa has become more than just a routine task – it’s an experience. Imagine being the guiding light that connects individuals with their dream beauty destinations, making their journey smoother and more enjoyable. In this simple guide you’ll learn how to create, start & design your own beauty salon directory website for a self-care and beauty take center stage.
If you’re intrigued by the idea of creating a platform that not only offers beauty insights but also fosters a sense of community among beauty enthusiasts, then creating a beauty salon directory is a path worth exploring.
In this guide, we’ll break down the steps to start your very own beauty salon directory website using WordPress without coding knowledge, from conception to execution. Whether you’re a seasoned entrepreneur or a passionate beauty lover, get ready for a journey that blends your love for aesthetics with the realm of online entrepreneurship.
What is a Beauty Salon Directory?
A directory of beauty salons is a digital platform designed to assist individuals in locating and accessing beauty salons, spas, barbershops, and wellness centers. It serves as a one-stop destination where users can discover various beauty service providers, explore their offerings, and make informed decisions about their self-care needs.
These directories typically offer details such as salon descriptions, services offered, pricing, location information, contact details, and customer reviews, allowing users to choose establishments that align with their preferences. Popular examples include StyleSeat, Booksy, and BeautySeeker.

Prerequisites for Creating a Beauty Salon Directory
To transform your beauty salon directory website into reality, you’ll require the following essentials:
- Hosting plan
- Domain name
- WordPress installation
- Directory plugin
- Directory theme
Securing a hosting provider, selecting a domain name, and installing WordPress are relatively simple tasks. However, the challenge is picking a reliable directory plugin and theme. For the purpose of this guide, we will use HivePress, a free directory plugin, along with its ListingHive theme. These options are not only free of cost but also user-friendly and offer extensive customization capabilities.
With all elements in place, we’re ready to dive into the tutorial section and bring your beauty salon directory concept to reality!
Steps to Create a Beauty Salon Directory
Here are the key steps to construct your beauty salon directory website using WordPress. Let’s begin with the installation of the theme.
Installation of ListingHive & HivePress
To start, let’s install the ListingHive theme. This can be done directly from your WordPress Dashboard. Navigate to the Appearance > Themes section, then select Add New. Search for “ListingHive,” and proceed to Install and Activate it.
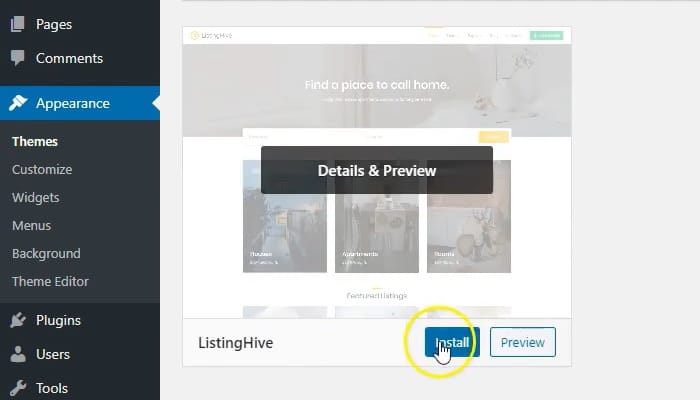
Once the theme is activated, you’ll receive a prompt to install the HivePress plugin, which will power all directory features. Follow the provided link to start the installation process. After installation, click the return link and activate the HivePress plugin. With these initial steps completed, we’re ready to move forward.
Adding Salon Categories
The next step is to incorporate beauty salon categories into your directory. This will help users conveniently explore the available options. For example, let’s add the following categories: “Hair Salons”, “Nail Salons”, “Skin Care Salons”, “Spas”, “Makeup Studios”, and “Barbershops”.
To proceed, navigate to the Listings > Categories section. Here, you can define the category name, optionally include a description, and upload a relevant category image. Once satisfied, finalize by clicking the Add Category button. Keep reading to this simple guide to learn how to create, start & design your own salon directory website for a self-care and beauty take center stage.
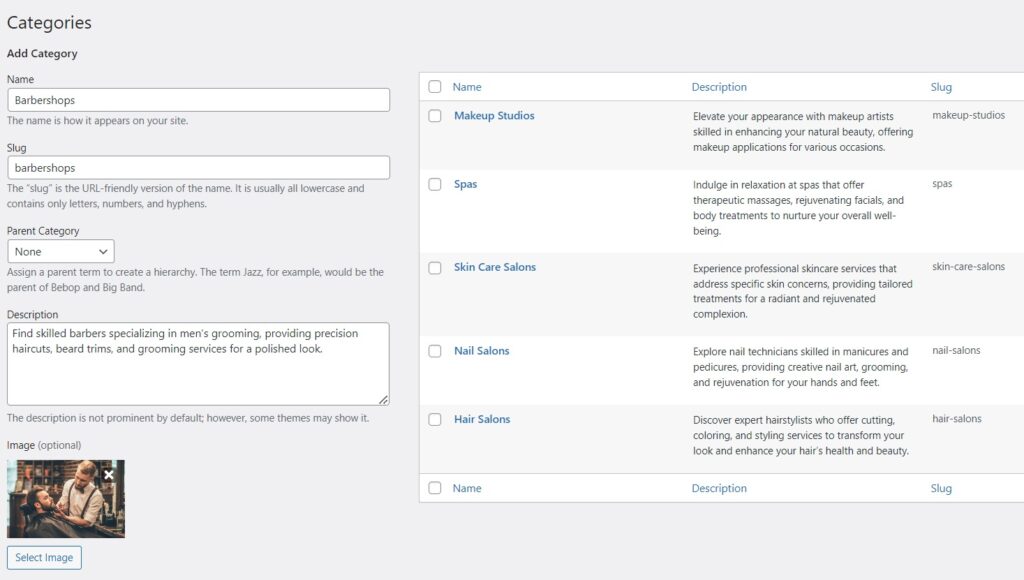
Similarly, you are free to include as many categories as required. Additionally, you can establish subcategories by linking them to an existing parent category. This hierarchical arrangement provides a structured way for users to navigate through your directory.
Adding Custom Fields
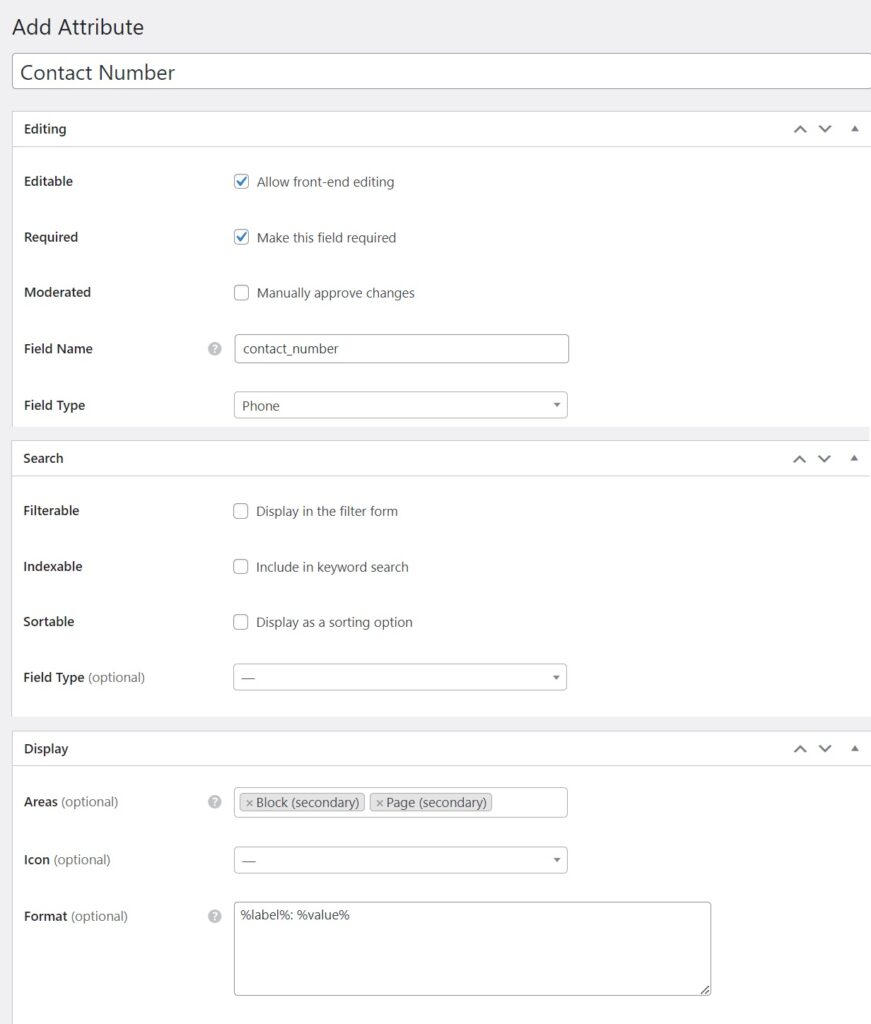
After finalizing the categories, the next step involves adding essential custom fields. For instance, let’s consider the widely-used “Contact Number” field to provide contact information. To do this, navigate to Listings > Attributes. Click the Add New button and input the field details based on the field type.
- In the Editing section, specify the custom field name and enable front-end editing, allowing users to input their salon’s contact number. Also, ensure this field is required and select the “Phone” field type.
- In the Search section, you can adjust the field’s search settings. But the “Contact Number” field doesn’t require the search functionality, so you can simply skip it.
- Display settings determine the field’s appearance on pages. Let’s choose Block (secondary) and Page (secondary) display areas and use a %label%: %value% display format. You can explore all available tokens by hovering over the question mark symbol.
When finished, click the Publish button to create your salon directory website.
Keep in mind that you can add as many custom fields as required. This flexible approach helps you customize your beauty salon directory to meet different information needs.
Adding Pages and Customizing Your Website: Beauty Salon Directory Building Guide
Now, let’s create an engaging homepage for your beauty salon directory website. Thanks to HivePress’s easy integration with the WordPress block editor, making and editing a homepage is simple. Go to the Pages section in your Dashboard and begin by clicking the Add New button.
Then, add the page title, such as “Home”, and start adding layout blocks. Click the Plus icon and choose the blocks you want, such as the Listing Search Form block, Categories block, Recent Listings block, and others. Once you’ve created the layout to your liking, finish by clicking the Publish button.

Next, go to Dashboard > Settings > Reading. Here, you can select the page you’ve just created as your website’s homepage to start a beauty salon directory.

To customize your website’s appearance, open your site from the Dashboard and click on the Customize button. You can fine-tune different elements to match your preferences and create a unique and welcoming online identity. Moreover, you can add site menus, widgets, and other features to enhance the user experience. Watch the tutorial video provided below to get a comprehensive understanding of this process:
Extending Functionality
Note that you can improve your website’s functionality by using free and paid extensions, which are available in the HivePress > Extensions section. These add-ons will take your beauty salon directory to new levels, and it is recommended to install at least a few essential ones. For example:
- The Geolocation extension provides location-based searches
- The Reviews extension enables visitors to rate and share their opinions on listings
- The Bookings extension allows appointment scheduling
- The Favorites extension helps users to save their favorite salons
- The Opening Hours extension ensures precise operating hours
- The Messages extension allows private communication on your website
Remember that there is constant room for improving the user experience of your website.
Checking Functionality
Now, it’s time to put our efforts to the test and experience the user’s perspective. To do this, go to your website and click on the Add Listing button. Here, provide the required details, such as the salon’s name, category, and relevant image, and also fill in the previously created fields.
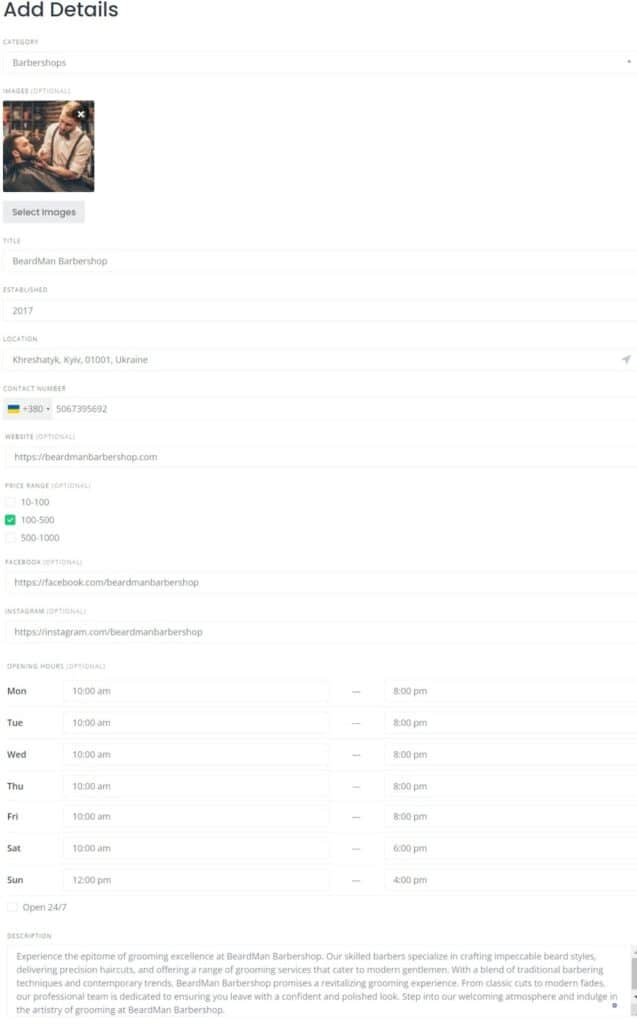
Next, go back to the Listings section in your Dashboard and approve the submitted listing. Keep in mind that you can turn off manual approval in Dashboard > HivePress > Settings > Listings. Many other essential settings are also there, so spare some time to go through them all.
Once the listing is published, users will be able to view it and access essential information about the salon – from the detailed description of services offered to the opening hours and contact information, so potential customers can easily make informed decisions.

Monetization
Finally, let’s talk about the monetization options for your beauty salon directory. It’s important to note that good website traffic is essential for effective monetization. To achieve this, prioritize enhancing user experience to build credibility and attract a wide-ranging audience. Once you’ve successfully accomplished this, consider implementing some well-established monetization strategies for your directory:
- Featured Listings: you can generate revenue by offering businesses the opportunity to promote their salons for a fee.
- Listing Claiming: you can allow businesses to take ownership of their salons through a claiming process. For example, you can list the salon yourself, and then reach out to owners and offer them the option to claim it. This monetization approach not only generates revenue but also ensures accurate and relevant information is consistently displayed on your platform.
- Advertising Space: also, you can consider selling advertising space on your website. This can involve integrating platforms like Google AdSense or directly approaching advertisers to display ad banners. However, try to maintain a balance between revenue generation and maintaining a positive user experience. Avoid excessive ads that could potentially impact visitor engagement negatively.
Conclusion
And that’s it! By following the steps described in this guide, you can establish a platform that serves as a valuable resource for beauty enthusiasts and contributes to the growth of businesses in the industry. With careful planning, customization, and dedication to user experience, your beauty salon directory can thrive in the competitive landscape.
In case you’re still uncertain about your WordPress toolkit, consider HivePress and ListingHive. This robust pair can provide you with a great foundation for your project, offering ease of use and a wide range of features to craft a successful directory.
The post How to Start Your Own Beauty Salon Directory: A Simple Guide appeared first on Visualmodo.


0 Commentaires